Page 1    123456

RSIC-1 SOUND ISOLATION SYSTEMS

RSIC-1 INSTALLATION GUIDE


Page 2    123456

RSIC-1 SOUND ISOLATION SYSTEMS


Drywall Furring Channel: (AKA “Hat Track")

  • Requirements: 25 gauge, hemmed edge detail required on all 25 gauge furring channel. Meets or exceeds SSMA requirements.
  • Depth: 7/8 inch
  • Width Bottom: 2-1/2 inch wide minimum.
  • Width Top: 1-1/4 inch wide

Splice drywall furring channel (hat track) with 6 inch overlap in mid span (between two clips) secure with 18 ga tie wire, or two 7/16" framing screws.


Resilient Sound Isolation Clip (RSIC-1)

  • Maximum Spacing: 48 inches on center
  • Maximum Acoustical Design Load: 36 lbs

Fasteners:

  • RSIC-1 to Wood: #8 x 2-1/2 inch minimum size coarse thread screw.
    (Recommended #12 or #10 x 2-1/2 inch hex head)
  • RSIC-1 to Steel: # 8 x 1-5/8 inch minimum size fine thread screw.
    (Recommended #12 or #10 x 1-5/8 inch or longer fine thread screw)
  • DO NOT fasten Resilient Sound Isolation Clips (RSIC-1) to framing members with nails. Use only approved screws.

RSIC-1 Dimensions:

  • RSIC-1 clip 3" tall
  • RSIC-1 clip 1-1/4" deep
  • RSIC-1 and drywall furring channel 1-5/8" deep

Average Labor Rates:

  • RSIC-1: 72 clips per man hour
  • Drywall Furring Channel: 550LF per man hour

Labor rates provided to PAC International, Inc by an independent contracting firm.


Page 3    123456

RSIC-1 SOUND ISOLATION SYSTEMS


WALLS: One and Two Layers of 5/8" Gypsum Board

  • Resilient Sound Isolation Clips (RSIC-1) shall be 48 inches maximum on center (horizontal).
  • Fasten the Resilient Sound Isolation Clip (RSIC-1) to the substrate with a fastener approved for a minimum pull-out and sheer of 120 lbs.
  • Ensure the internal metal ferrule is tight to the substrate.
  • Locate the first row of RSIC-1 clips within 3 inches from the floor and within 6 inches from the ceiling.
  • Snap in the drywall furring channel (hat track) into the RSIC-1 clips (horizontal for walls). (see page 2 for splice details)
  • Place 1/4" (minimum) shim on floor to fully support the gypsum board.
  • Install the gypsum board from the bottom up leaving a 1/4" min. gap around the perimeter of the wall.
  • ONLY remove the shims after ALL the gypsum board is completely screwed to ALL the drywall furring channels. Make sure every screw (floor to ceiling and wall to wall) is installed as required by the assembly design, in every layer of gypsum board before removing the shims at the floor. The shims are critical to ensure best results.
  • Caulk around the entire perimeter of the gypsum board. Use fire and smoke rated acoustical sealant where required.

Ceilings: One and Two Layers of 5/8" Gypsum Board

  • Resilient Sound Isolation Clips (RSIC-1) shall be 48 inches maximum on center.
  • Fasten the Resilient Sound Isolation Clip (RSIC-1) to the substrate with a fastener approved for a minimum pull-out and sheer of 120 lbs.
  • Ensure the internal metal ferrule is tight to the substrate.
  • Locate the first row of RSIC-1 clips within 8 inches of the wall at each end of a run.
  • Snap in the drywall furring channel (hat track) into the RSIC-1 clips.
  • Install the gypsum board from leaving a 1/4" min. gap around the perimeter of the ceiling.
  • Caulk around the entire perimeter of the gypsum board. Use fire and smoke rated acoustical sealant where required.

General Information:

  • Refer to www.UL.com, or www.pac-intl.com for complete installation details on all fire resistive assembly designs.
  • Resilient Sound Isolation Clip (RSIC-1), furring channel (hat track) and gypsum board shall not carry heavy loads such as cabinets or bookshelves.
  • For focused loads add RSIC-1 Backer clip.
  • Splice furring channel (hat track) with 6 inch overlap in mid span, secure with 18 ga. tie wire or with two framing screws (7/16")
  • Seal all potential air leaks with non-hardening acoustical caulking to achieve best noise control results. Use fire rated sealant where required.
  • When attaching the

Fire Test Information:

Approved for use in over 150 different UL fire resistive design assemblies.
Check our website for the latest updates of the fire testing approvals WWW.PAC-INTL.COM
Check UL Fire Resistance Directory File # R16638
Check UL’s web pages. www.ul.com/database
Contact UL (877) UL– HELPS


Page 4    123456

RSIC-1 SOUND ISOLATION CLIP SYSTEMS

APPLICATION RECOMMENDATIONS FOR WALLS AND
CEILINGS, WOOD OR STEEL FRAMING

INSTALLING RESILIENT SOUND ISOLATION CLIPS (RSIC-1)

RSIC CLIPS AT 24" OC. 1 or 2 Layers of Gyp Board


RSIC-1 Wall or Ceiling System Framing at 24" o.c.

RSIC-1 clips at 24" x 48" o.c. with 1 or 2 Layers of 5/8" Gypsum Board


RSIC-1 Wall or Ceiling System Framing at 16" o.c.

RSIC-1 clips at 24" x 48" o.c. with 1 or 2 Layers of 5/8" Gypsum Board


Page 5    123456

RSIC-1 SOUND ISOLATION SYSTEMS

APPLICATION RECOMMENDATIONS FOR WALLS AND
CEILINGS, WOOD OR STEEL FRAMING

INSTALLING RESILIENT SOUND ISOLATION CLIPS (RSIC-1)

RSIC CLIPS AT 16" OC. 3 Layers of 5/8" Gyp Board


RSIC-1 Wall or Ceiling System Framing at 24" o.c.

RSIC-1 clips at 16" x 48" o.c. with 3 Layers of 5/8" Gypsum Board


RSIC-1 Wall or Ceiling System Framing at 16" o.c.

RSIC-1 clips at 16" x 48" o.c. with 3 Layers of 5/8" Gypsum Board


Page 6    123456

RSIC-1 SOUND ISOLATION SYSTEMS


Members of the International Code Council


WARRANTY DISCLAIMER AND LIABILITY LIMITATION LANGUAGE
NO EXPRESS OR IMPLIED WARRANTIES

THERE IS NO WARRANTY, REPRESENTATION OR CONDITION OF ANY KIND; AND ANY WARRANTY, EXPRESS OR IMPLIED, IS EXCLUDED AND DISCLAIMED, INCLUDING THE IMPLIED WARRANTIES OF MERCHANTABILITY AND OF FITNESS FOR A PARTICULAR PURPOSE. Some states do not allow limitations on implied warranties, so the above limitation may not apply to you.

LIABILITY LIMITED TO RETURN OF PURCHASE PRICE

IT IS AGREED THAT SELLER’S LIABILITY AND PURCHASER’S SOLE REMEDY, WHETHER IN CONTRACT, UNDER ANY WARRANTY, IN TORT (INCLUDING NEGLIGENCE), IN STRICT LIABILITY OR OTHERWISE, SHALL NOT EXCEED THE RETURN OF THE AMOUNT OF THE PURCHASE PRICE PAID BY PURCHASER, AND UNDER NO CIRCUMSTANCES SHALL SELLER BE LIABLE FOR ANY SPECIAL, INCIDENTAL OR CONSEQUENTIAL DAMAGES, INCLUDING, BUT NOT LIMITED TO, PERSONAL INJURY, PROPERTY DAMAGE, DAMAGE TO OR LOSS OF EQUIPMENT, LOST PROFITS OR REVENUE, COSTS OF RENTING REPLACEMENTS AND OTHER ADDITIONAL EXPENSES, EVEN IF SELLER HAS BEEN ADVISED OF THE POSSIBILITY OF SUCH DAMAGES. THE PRICE STATED FOR THE EQUIPMENT IS A CONSIDERATION IN LIMITING SELLER’S LIABILITY AND PURCHASER’S REMEDY. Some states do not allow the exclusion or limitation of incidental or consequential damages, so the above limitation or exclusion may not apply to you.

SELLER NOT LIABLE FOR PURCHASER’S NEGLIGENCE

SELLER WILL NOT BE LIABLE FOR ANY DAMAGES, LOSSES OR EXPENSES AS A RESULT OF PURCHASER’S NEGLIGENCE, WHETHER DEEMED ACTIVE OR PASSIVE AND WHETHER OR NOT ANY SUCH NEGLIGENCE IS THE SOLE CAUSE OF ANY SUCH DAMAGE, LOSS OR EXPENSE.

MODEL FOR DEMONSTRATION PURPOSES ONLY

THE MODEL OR SAMPLE SHOWN BY SELLER TO BUYER IS USED FOR DEMONSTRATION PURPOSES ONLY. THERE IS NO WARRANTY THAT THE GOODS AS DELIVERED SHALL CONFORM TO THE MODEL OR SAMPLE, AND CONFORMITY OF THE GOODS TO THE MODEL OR SAMPLE IS NOT PART OF THE BASIS OF THE BARGAIN BETWEEN SELLER AND BUYER.

NO WARRANTY OR COMPLIANCE WITH SAFETY CODE OR REGULATION

SELLER DOES NOT WARRANT THAT ANY OF THE GOODS SOLD WILL MEET OR COMPLY WITH THE REQUIREMENTS OF ANY SAFETY CODE, BUILDING OR DWELLING CODE, OR REGULATION OF ANY STATE, MUNICIPALITY OR OTHER JURISDICTION.

NEVADA LAW APPLIES

SELLER AND BUYER AGREE THAT ALL ASPECTS OF THIS TRANSACTION INCLUDING THE APPLICABLE STATUTE OF LIMITATIONS SHALL BE GOVERNED BY THE INTERNAL LAW OF THE STATE OR NEVADA, AND NOT THE LAWS OF CONFLICTS. This warranty gives you specific legal rights, and you may also have other rights which vary from state to state.
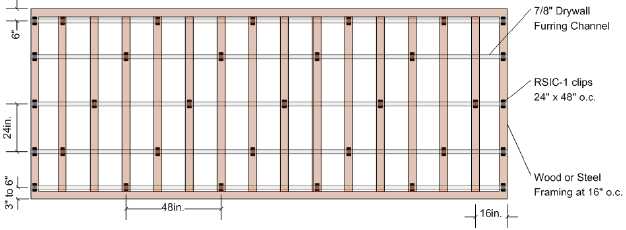
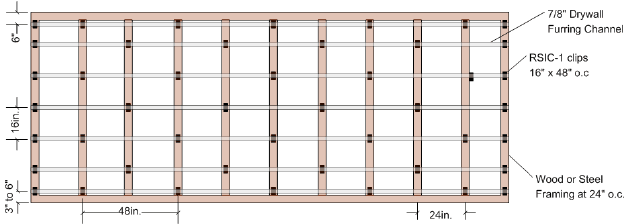
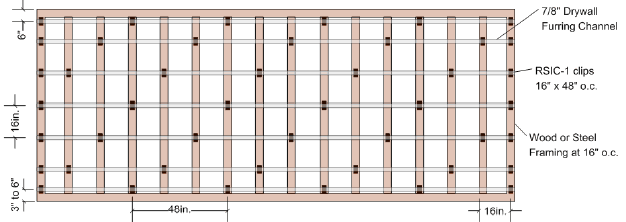

[ back to top ]